
Unity’s motion curve editor is an easily overlooked feature, but it’s a powerful tool for game developers … especially when it comes to adding game development tools for non-coders to tinker with.
Note: This is an advanced tutorial, recommended for those already familiar with the Unity3D game engine.
Why is it so often overlooked?
Perhaps, it is because the folks at Unity are still going with the inappropriate name AnimationCurve. (Although it’s a great tool for animation, it is a simple tool that has so many more uses.) Or perhaps it’s due to the limited documentation … or the needlessly complicated examples in the forums. Whatever the case, it’s a pretty awesome tool … and maybe the easiest way to explain why is with an example. I expect this will spark you to think of a thousand more uses.
A Sample Use Case
Starting with the basic idea that you might want to linearly interpolate between previously defined start and end points, you can do this using the built-in LERP functions.
The code below is a basic idea of what you might need.
public Update()
{
    float currentAge -= Time.deltaTime;
    float percentAge = 1.0f - (currentAge / lifeSpan);
    Vector3 newPos = Vector3.Lerp(startPos, endPos, percentAge);
}
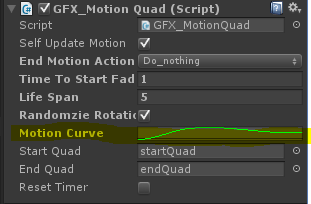
Code to create a new animation curve (with a default LERP).
public AnimationCurve motionCurve = AnimationCurve.Linear(0, 0, 1, 1);
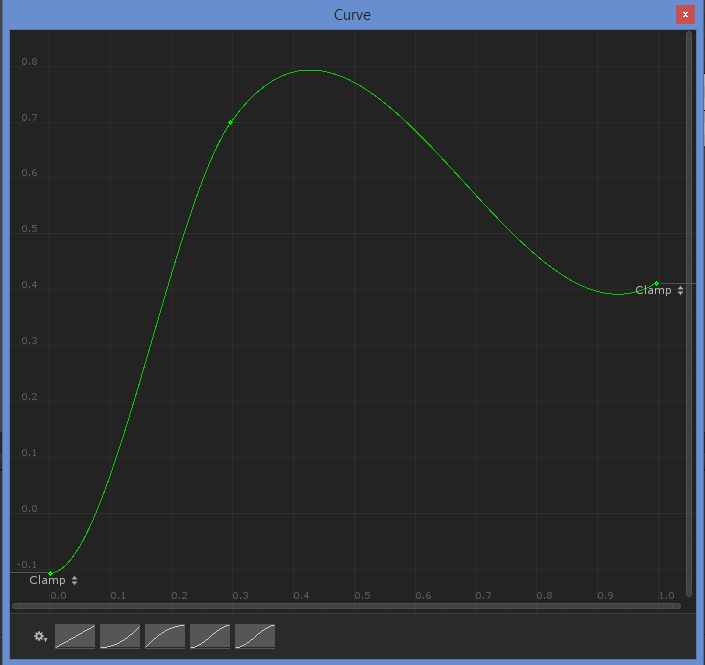
When you click on the animation curve in the inspector, you’ll get a pop-up window for the Curve Editor in which you can add keys and create all kinds of beautiful curves. You can also select from common curves, or save your own.
Now, to use the animation curve’s Evaluate function, simply pass in a value from zero to one and the get a return value (based on the curve). Then, just pass the result into your LERP function instead. It really is that simple
    //...
    float curvedValue = motionCurve.Evaluate(percentAge);
    Vector3 newPos = Vector3.Lerp(startPos, endPos, curvedValue);
    //...
Using the above curve, I now get the following transform transition:
![2D Graphics Programming for Games [book] Thumbnail](https://prof.johnpile.com/wp-content/uploads/2013/12/2dGraphicsBookThumb.png) For more topics on 2D graphics programming, be sure to check out my book, 2D Graphics Programming for Games available now both online and through your favorite independent bookseller.
For more topics on 2D graphics programming, be sure to check out my book, 2D Graphics Programming for Games available now both online and through your favorite independent bookseller.
3 comments on “Unity | Using the Motion Curve”
Great introduction write-up. One thing understanding AnimationCurves sparked for me is using them to generate random numbers over a weighted distribution. Found another post about that after failing to getting it working myself: http://unitytips.tumblr.com/post/67259382850/use-animationcurve-to-define-probabilistic-random
That’s really sexy!