
Backstory:
I was on a motorcycle ride at the end of the week when I started thinking, “If the pixel shader is running for every pixel, (and that’s exactly what a ray tracer does) could you write a ray-tracer in the pixel shader so that all the bounces for an individual ray are calculated in a single pass of the pixel shader, allowing for Realtime Ray Tracing.”
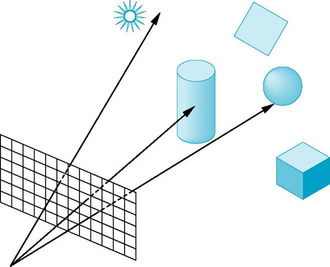
Step 1: Ray Casting
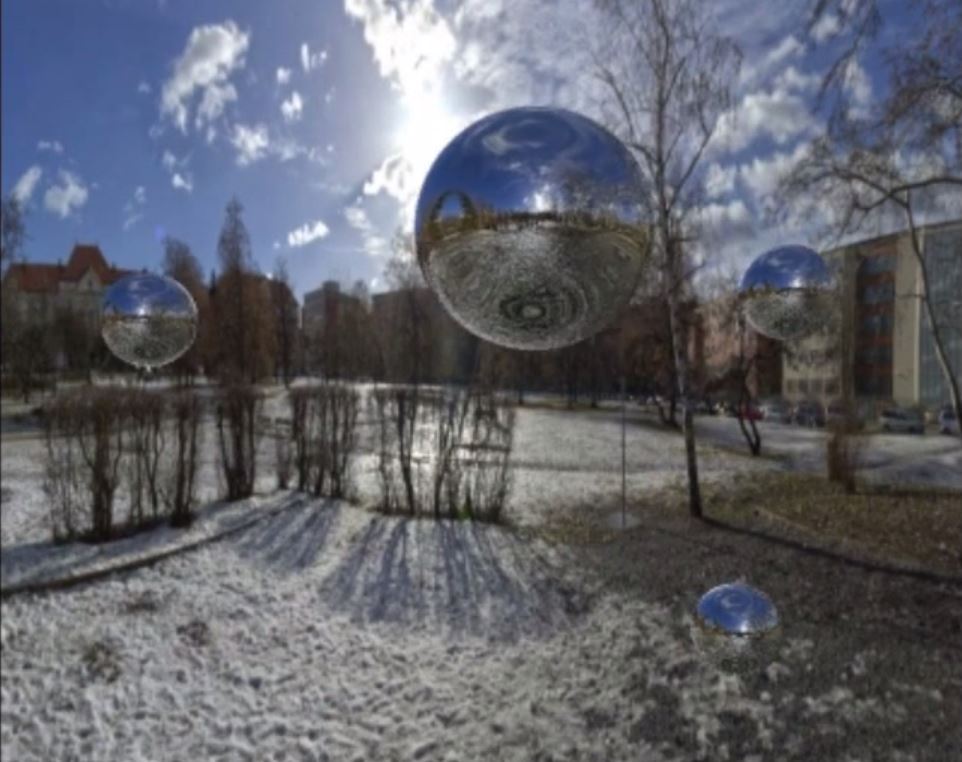
To prove to myself that I wasn’t crazy, I took an hour on Saturday morning and made a ray caster. That is, a ray tracer where the light is traced back to the objects in the scene, but does not bounce.
The scene is lit using the ambient color of the object, resulting in a silhouette.
That was easy (using a scene made of 4 equal sized spheres), but obviously doesn’t look very impressive. However, it did prove the concept.
In order to make something that looked a bit more interesting, I added a light source and a simple diffuse shading. (Determine the amount of light for a point on the sphere by using the dot product of the surface normal with the light vector).
I also added a visual representation of the light (another sphere). I then added the ability to move the light source (because otherwise there’s no point in the fact that this is running in real-time.
The only real issue I had was getting it to compile to pixel shader model 3.0. The default for XNA is PS_2_0 which limits you to 64 instruction slots. I needed significantly more for the unrolling of the for-loop. With Shader Model 3.0 you have 512 instruction slots available. That’s great, but getting XNA to compile to PS3.0 means you also need to compile the default Vertex Shader to 3.0. See the link for a short post about how to make that happen with XNA.
Step 2: Ray Tracing
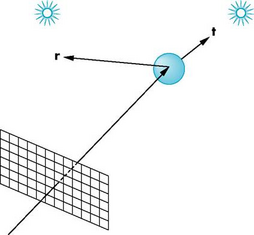
The next step was to get the rays to bounce off the spheres. Easy enough with HLSL’s built-in reflect function which returns a reflected ray when given an original ray and the surface normal at the point of intersection with the sphere.
reflect(ray, normalize(intersection - sphere[i].center))
I then pass the most recent computed color of the pixel, along with the new ray and origin into the same function as used previously. Ideally, this recursive algorithm does the bulk of the work. But unfortunately, “error X3500: recursive functions not yet implemented” occurs if you try to do this in the Pixel Shader (3.0). To get around this, I simply created another function called “trace2”, and subsequent “trace3” which are almost identical to the first. Just 1 bounce is enough to get the mirror ball effect, and 2 bounces gives a final touch.
Of course the beauty of the ray tracer is not in the bounces, but in the final sky color that propagates through those bounces. That is, if the ray does not intersect any of the spheres the final sky color is used. In my first attempt (Ray Tracer 02, below) I use the following logic: if the ray does not intersect a sphere, then check the y value of that ray. If the y-value is positive (ray is pointing up) dot the ray with the normal vector, multiplying the results by the color blue.
In the next version (Ray Tracer 03, below), I check I find the intersection of downward moving rays with the XZ plane. I then check the modulus of that intersection on the z-axis to create stripes.
if (intersection[2]%2 == 0) { color = white };
Note that you can see in the second video (Tray Tracer 03) that the spheres appear translucent. That’s because I have combined the color created when the rays intersect with the color as if they did not intersect. This is not really the way refraction works, but it created an interesting effect.
Step 3: Oculus Rift
So, after a couple hours of playing I was done with my weekend project. While there was still the issue that it only involved 5 spheres, further work would have to wait for another free weekend. That is, until I once again hopped on the motorcycle for a quick ride back from the cider house … when I thought:
If the pixel shader receives a camera position to calculate the resultant ray that it uses, couldn’t I run the shader a second time with an offset camera position, allowing for a 3D perspective?
When returning home I had to give it a try. I run the pixel shader once with the camera offset to the left, then again with the camera offset to the right, and render the two images side by side. I then placed an Oculus Rift style border over the whole thing.
Rather than calculating the exact values for the camera offset, I allowed the values to be modified with keyboard input, strapped on the rift, and adjusted the offset until the spheres in the center of each image merged into one. The rest of the image just fell into place.
Very cool, and not bad for a Saturday and Sunday morning.
Next Steps
Thinking about what I want to do next, I thought I could map a texture onto the floor plain. My math for the floor intersection is a little bit off, but once I have that fixed, I think it should be really easy to sample from a texture for the downward pointing rays.
After that, I’d like to add a little bit of randomness to the rays. Individual pixels really stand out when looking through the low resolution Rift, especially because of the contrast between a brightly lit pixel and a neighboring dark pixel. I plan to combine a couple passes of results from slightly different perturbed rays, hopefully creating a nice blended effect.
One of the problems I’m running into now is that I’ve hit against the upper edge of 512 instructions slots in the pixel shader 3.0 model. I’ve got some ideas about how to simplify some of the calculations and that will also need incorporated in any further work.
Update – SkyBox
I had a couple hours today and decided it was time to implement a sky box. Actually, my first plan was to simply add a ground plane that I could place a texture on. I added ray-plane intersection algorithm, but couldn’t get it to work quite right. But after wrestling with it for a while, I walked away for a break and immediately thought of another solution. Why not use a spherical skybox instead of the cube? The math should be much simpler.
I did a few calculations and thought I must be doing something wrong because it was way too simple. I even had to check the web to see what I was missing. But I was wrong, it really was that simple. I replaced a fairly complicated ray-plane intersection to map a single floor texture…
float3 rayPlaneIntersect(float3 planeNormal, float3 planeOrigin, float3 rayOrigin, float  rayDirection)

{

float3 dist = dot (planeNormal, ( planeOrigin - rayOrigin )) / dot(planeNormal, rayDirection);

return (rayOrigin + (rayDirection * dist));

}

...

float3 intersect = rayPlaneIntersect(upVector, bottom, origin, ray);

float2 surfacePoint = {(intersect[0])+0.5f, (intersect[2])+0.5f};

color = tex2D(Texture, surfacePoint);
With an exceedingly simple bit of math to map the entire “sky sphere”:
float2 surfacePoint = {1.0f + ray[0], 1.0f -ray[1]};

surfacePoint *= 0.5f;

color = tex2D(Texture, surfacePoint);
In the process I broke the Oculus Rift alignment, so that’s a next step. The only problem is when the rift goes wrong, it makes me nauseous pretty quickly. So I’ll have to wait until my head stops spinning.

1 comment on “Prototype | Exploring Realtime Raytracing (Xbox 360)”
Hi John,
What you found on the bike on the way back home also was the key point for me to understand your article and ray tracing in GPU.
I realized that you are using this ray tracing method as a solution for lightning the scene. And in PixelShaderFunction method you check the intersection of a ray with 5 spheres.
In another project I’m trying to render the scene using ray tracing method on GPU. So I assume, I need to check the ray intersection with all(or at least a set of) the triangles instead of only 5 spheres. How is it possible to access the triangles info needed for ray intersection checking in HLSL?
Thanks,
Ali